Beyond establishing the credibility you need to convert landing page visitors, did you know that SSL (Secure Sockets Layer) extends the possibilities for where you can feature your landing page offers?
Take Facebook tabs, for example.
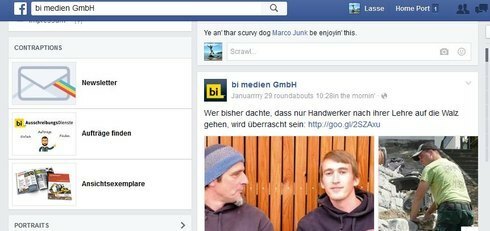
Facebook tabs are customized pages within your fan page or business page that allow you to highlight a special offer, promote a contest, or anything else you have in mind via an extra tab along your tabs bar. These tabs are helpful in that they showcase your landing page directly within the Facebook interface, so you don’t add any friction to the user experience.
The Facebook tabs appear on your business page right below the cover photo
Now, for some marketers, custom tabs went the way of the dinos when Timeline layout for business pages came into play back in 2012, but if you’re passing on custom tabs, consider how they could help improve the first impression you set on this channel.
While Facebook tabs aren’t a hot spot for long-time fans of your page, they’re prime real estate for new visitors who’ve just liked your page. Custom tabs are critical for capturing the attention of those who are visiting your Facebook for what could be the first and last time. We tend to rely on our favourite brand’s updates appearing in our newsfeed, so you may only see first-time visitors on your page once and once only. Making the most out of this visit and directing folks to take advantage of your offers is key.
Instead of just the standard Timeline, About, and Photos tabs, get your page to do some heavy lifting with tabs prompting newsletter signups, promotions, or new content offers you have up for grabs.
The World Wildlife Fund does a good job of this, using custom Facebook tabs to highlight special initiatives, and drive newsletter signups.
And Air New Zealand has recently run a contest using Facebook tabs in this way too. Here’s how that looks once you click their Jump the Queue tab:
As you can see, using landing pages to fuel a Facebook tab can be a great opportunity to collect leads’ contact info while they’re are engaged with your brand.
You can set up your own Facebook tab in Unbounce by following the steps below:
Adjust the width of your Unbounce landing page to 785px.
A typical Unbounce landing page is 960px wide, so your page will require a bit of tweaking after you adjust the width. To learn how to edit the width of your page, click here.
Login to Facebook as a Facebook Developer.
- Visit https://developers.facebook.com/apps, and log in with your regular Facebook credentials.
Create your new Facebook Tab.
-
In the top right, click the bright green ‘Create a New App’ button.
-
Then, to the far right, click ‘Website’.
-
In the top right, click ‘Skip and Create App ID’.
-
Enter your ‘Display Name’ (this is what your tab will be displayed as on your Facebook Page, and it’ll be what your customers see, so choose wisely!)
-
Under ‘Category’ select ‘Apps for Pages’.
-
Now click, ‘Create App ID’ , and move over to your App Dashboard.
Configure your Facebook Tab.
-
In the left menu, click ‘Settings’.
-
Enter a contact e-mail address, and click the ‘+ Add Platform’ button at the bottom.
-
In the Select Platform window, select Page Tab (with the flag icon).
-
In the ‘Secure Page Tab URL’ box, add the URL of your Unbounce landing page. Be sure that your URL starts with https://, otherwise it won’t work.
-
Select “Yes” under ‘Wide Page Tab?’ so that your landing page fills the width of the tab.
-
When you’ve finished editing this section, click “Save Changes” on the bottom right, and move to the final step!
Make your Facebook Tab public.
- In the menu to the left, click ‘Status and Review’, and make your Facebook Tab live by toggling over to ‘yes’, and clicking ‘confirm’.
Add your new custom Tab to your Facebook Page.
You’ve reached the final step!
- To add your new custom Tab to your Facebook page, modify the following link with your unique URL parameters, and paste it in your address (URL) bar.
Here’s the link you need to modify:
http://www.facebook.com/dialog/pagetab?app_id= YOUR_APP_ID &next= YOUR_URL
You’ll need to replace the bolded/underlined parts.
YOUR_APP_ID - locate this in Settings --> Basic, as seen here:
YOUR_URL - this is the URL of your Unbounce landing page. Locate this in Settings --> Basic, as seen here:
Using the example above, my custom URL would be:
http://www.facebook.com/dialog/pagetab?app_id=1444212725876399&next=https://ssl.yuli-analytics.com/tab-demo/
-
Once you have your unique URL, copy and paste it in your address (URL) bar, and press enter. After you see the popup that appears, select where you’d like to add your new Facebook Tab, and click ‘Add Page Tab’.
-
Your Unbounce landing page will open in a full-screen.
-
Navigate back to your Facebook Page, and view your new Facebook Tab.
-
Congrats! You’ve created a custom Facebook landing tab!
To view Facebook’s official Tab documentation, check out this link here.
Are you using Facebook landing tabs as part of your social marketing strategy? Why or why not? Tell us below with a comment.
With SSL now available to Unbounce customers on any Pro level plan, you can experiment with Facebook landing tabs. What landing page offer will you take to social?
If you’d like to upgrade to a Pro plan, head to your Account Settings in Unbounce and make the switch.

