Hey everyone!
Sometimes the only window third party systems provide to send lead data externally is through an embeddable form. On Unbounce this may not be ideal as using a custom HTML form means you’re not able to take advantage of several Unbounce features (visual form customization, integrations).
To get the best of both worlds you can merge the two together by replicating the form on Unbounce.
Steps
If you haven’t already generate or obtain your third party form code. Make sure it includes every field you wish to capture on your landing page.
Your embeddable form should consist of the raw HTML. There may be a lot of clutter in the code, so you may need to pick through all the junk to get to the important stuff. You’ll want to lookout for the following:
The <form></form> tag. It looks similar to this:
<form action="http//example.com/addlead" method="post">
The <input> tags. They look similar to this:
<input type="text" name="Email_Address"/>
<input type="hidden" name="campaignID"/>
(Your code must contain form and input tags for this to work)
What you’ll need to do is recreate every single input field given in the code as a field on your Unbounce form. Make sure to include any hidden fields as well.
When you recreate those fields be sure you match up it’s ‘name’ attribute. For example if we wanted to recreate the field
<input type="text" name="Email_Address"/>
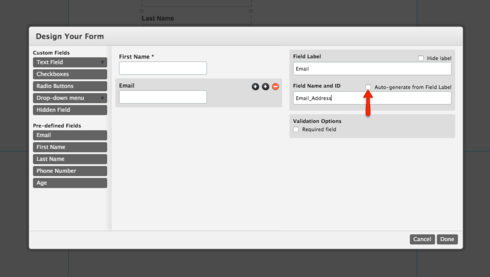
Then what you need to do on Unbounce is create a new field, set its label, then un-check the ‘Auto-generate from Field Label’ box
Set the ‘Field Name and ID’ to the fields ‘name’. In the example above it’s Email_Address.
Keep in mind that these fields are usually case sensitive. If your casing doesn’t match exactly with your form code, you risk that field or the entire lead from being rejected.

Once all your fields are mapped find the POST url within your tag
<form action="http//example.com/addlead" method="post">
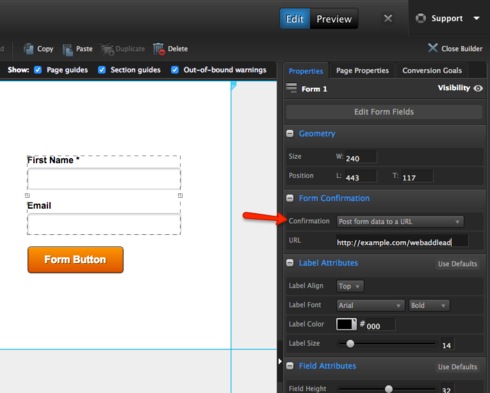
Change your forms confirmation to ‘POST form data to a URL’ and set the value to the same action URL. In the above example it’s:
"http//example.com/addlead"

Now save, publish, and test the live page!
Setting the confirmation/thank you page
Since the form will being doing a post, the user will also be redirected to the posting URL. Unless your posting endpoint doubles up as a confirmation page it may not be ideal.
Be sure to check your third party systems documentation as to how to redirect users to a thank you page after submission. In most cases you can set the URL on their end or define the redirect URL with a hidden field.


