Solved

[How to] Create Angled Page Sections (aka False Bottoms)


Userlevel 7
  • Former Unbouncer
  • 126 replies

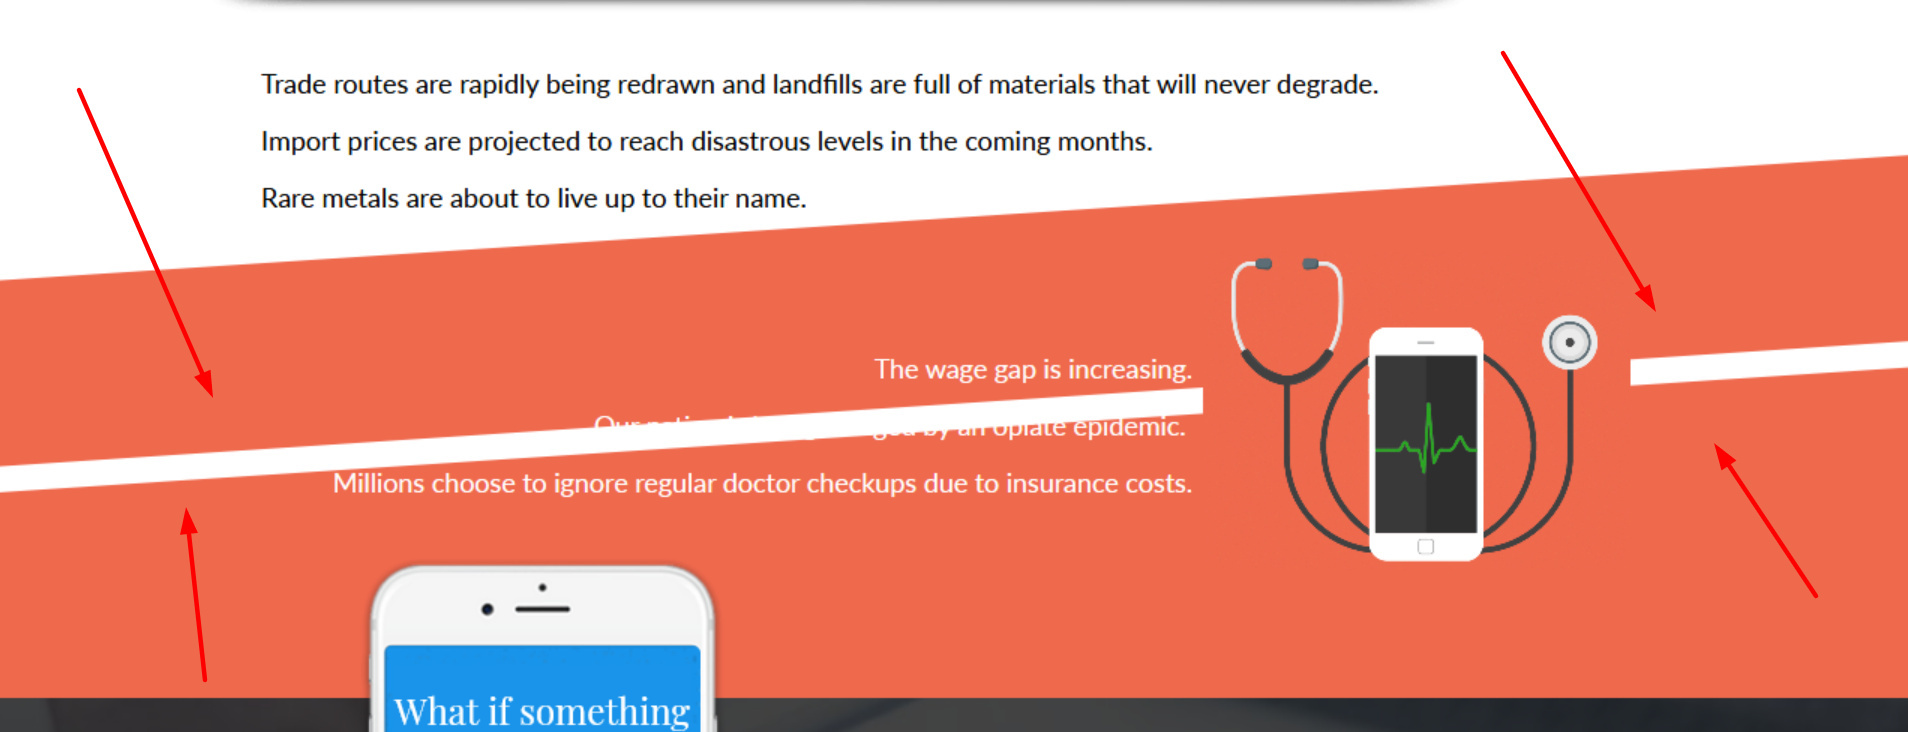
One of our favourite highlights from @Oli_Gardner’s talk at CTAConf 2017 was his tidbit on asymmetrical design - but more specifically, false bottoms.

Implementing angled page sections is is a subtle way to indicate that more content exists below the fold, and subconsciously prompts visitors to scroll down to find it.

This isn’t a native Unbounce feature, but we’ve put together a quick CSS script that will allow you to achieve this effect in Unbounce quickly and easily.

You can see this in action (built in Unbounce) here:
http://landingpage.noahmatsell.ca/angled-page-section-demo/


How to Install in Unbounce

Click Here for Instructions

🚨
This is not an official Unbounce feature. This functionality is based entirely on third party code, and has only been tested in limited applications. Since this isn’t a supported Unbounce feature, our support team will be unable to assist if things go awry. So if you are not comfortable with HTML, Javascript and CSS, please consider consulting an experienced developer.


Step 1.

🔗 Get the latest script here: https://gist.github.com/noahub/783cf6bc402bf4cc99cb84aa8927c8f8

Step 2.

Copy the CSS and paste in your Stylesheets

Step 3.

Create a page section and replace the the ID in the script with the target page section ID.

Step 4.

Use the #lp-pom-block-34:after CSS rule-set to give a section an angled bottom and #lp-pom-block-34:before to give a section an angled top.

Step 5.

Optional: Change the value of skewY in the CSS to increase or decrease the angle or your top/bottom.

That’s it!

Did you find this tip useful? Show us how you implemented it with a screenshot of your landing page in the comments below! 🙂


Can’t see the instructions? Log in or Join the Community to get access immediately. 🚀


Want to take your Unbounce landing pages + Convertables™ to the next level?
:spinbounce: Check out the Ultimate List of Unbounce Tips, Scripts & Hacks

icon

Best answer by Laserfocus 12 March 2020, 19:14

View original

37 replies

Badge

Hey guys, Ivan here again. 🙂

As always, love the work you are doing - please keep it up, absolutely amazing features!!!

I made a video showing how to set this up live inside of your Unbounce account, including changing the direction of the skew, and other features you might have wanted to implement.

Here is the video on YouTube:

Let me know if you have questions!

Ivan

This does not work.

Badge +1

When viewing these on ultrawide monitors I am getting these breaks. Is there an easy fix for this one?

Badge +1

@Mark_H

CSS
transform: skewY(-3.75deg); /change to increase/decrease angle/

You should be able to do some drastic tweaks editing the skewY figure

Anyone know what to change -3.75deg to in for the angle to go right bottom? With -3.75deg, it goes left bottom.

I’m having issues with the overlay in my background not accepting the angled section of the page. Any insight here?
@Noah

Thank you @Noah !!!

Hi Yosh, when I change the code like this, the angle doesn’t work at all. Any idea why?

I’m using an image, as I need a gradient in an angle that Unbounce doesn’t support.

Hi man,

I am trying the linear code, but it only cancels the angles. How did you solve the repeating situation?

Thank you for this, finally have a new unbounce site to actually test this on.

I think it’s going to kill it

@Noah @Stefano When I apply an angle of more than 7 deg I start to see wierdness. AKA the part of the bg that is angled breaks away from the rest of the background and some white bleeds through. Any way to get around this?

Joe

@Tristan_Ramberg
That looks like what mine looked like before changing the background to linear. Feel free to share your code in the thread or dm it to me and I can try and help.

Like others, I’m having issues with background images repeating and also skewing the image itself and am having difficulty trouble-shooting the cause.

Angled Hero Images & Gradients

For brand imagery and gradients in the hero/top section of a landing page, I adjusted @Noah original code and changed the “after” background element from inherit to “linear”.

Below is the adjusted code for the “after” section of code.

}
#lp-pom-block-8:after{
background: linear;
bottom: 0;
content: ‘’;
display: block;
height: 50%;
left: 0;
position: absolute;
right: 0;
transform: skewY(-5deg);
transform-origin: 100%;
z-index: 1;
}

// Yosh

@noah… brilliant. Simple solution.

Joe

Userlevel 7
Badge +4

Hey Joe!

My workaround was the same as Noah’s below… let me know if that works for you? I was having the same issues when having photos in the bg.

Userlevel 7

Hey @Joe_Savitch, I’d recommend applying the angled top/bottom to the sections before and after your section with the background image.

Userlevel 6
Badge +3

I had the same issue with images – couldn’t get it to work 😦

@noah or @Stefano have you tried using this with an image? Up until now I had only used solid color backgrounds and it has worked smooth as silk… but I just tried it with an image and it is no bueno 😦

The image repeats half way through the section. Is there a way to have this work with full width background images? Or is this really only for solid color backgrounds?

Joe

do you have an example of this?

Userlevel 7
Badge +4

Pleasure 🙂

@Stefano AH! I see where my mistake was. Awesome, thanks Stefano!

Userlevel 7
Badge +4

Sure! Here is my code.

#lp-pom-block-31 is the section above the section I want angled, which is why it is set to “:after” and #lp-pom-block-13 is the section directly below which is why it is set to “:before”. I am not setting anything to my section w/ the background.

Let me know if this helps!

<style>
/*This ensures diagonal bg doesn't block page content*/
.lp-positioned-content{
  z-index: 100;  
}
/*Replace #lp-pom-block-34 with your section ID to create an angled bottom*/
#lp-pom-block-31:after{
  background: inherit;
  bottom: 0;
  content: '';
  display: block;
  height: 50%;
  left: 0;
  position: absolute;
  right: 0;
  transform: skewY(-2.00deg); /*change to increase/decrease angle*/
  transform-origin: 100%;
  z-index: 1; 
}
/*Replace #lp-pom-block-34 with your section ID to create an angled top*/  
#lp-pom-block-13:after{
  background: inherit;
  bottom: 0;
  content: '';
  display: block;
  height: 50%;
  left: 0;
  position: absolute;
  right: 0;
  transform: skewY(2.00deg); /*change to increase/decrease angle*/
  transform-origin: 0;
  z-index: 1; 
}

#lp-pom-block-13:before{
  background: inherit;
  top: 0;
  content: '';
  display: block;
  height: 50%;
  left: 0;
  position: absolute;
  right: 0;
  transform: skewY(-2.00deg); /*change to increase/decrease angle*/
  transform-origin: 0;
  z-index: 1;   
}
  
</style>

@Stefano - Can you give me an example of how you did it? I tried something similar and still had the angles not able to sit overtop of the image without the white break. Instead, there was just a white space where the angles climbed/dropped on the bottom of the top section and the top of the bottom section.

Userlevel 7
Badge +4

My pleasure!

Reply