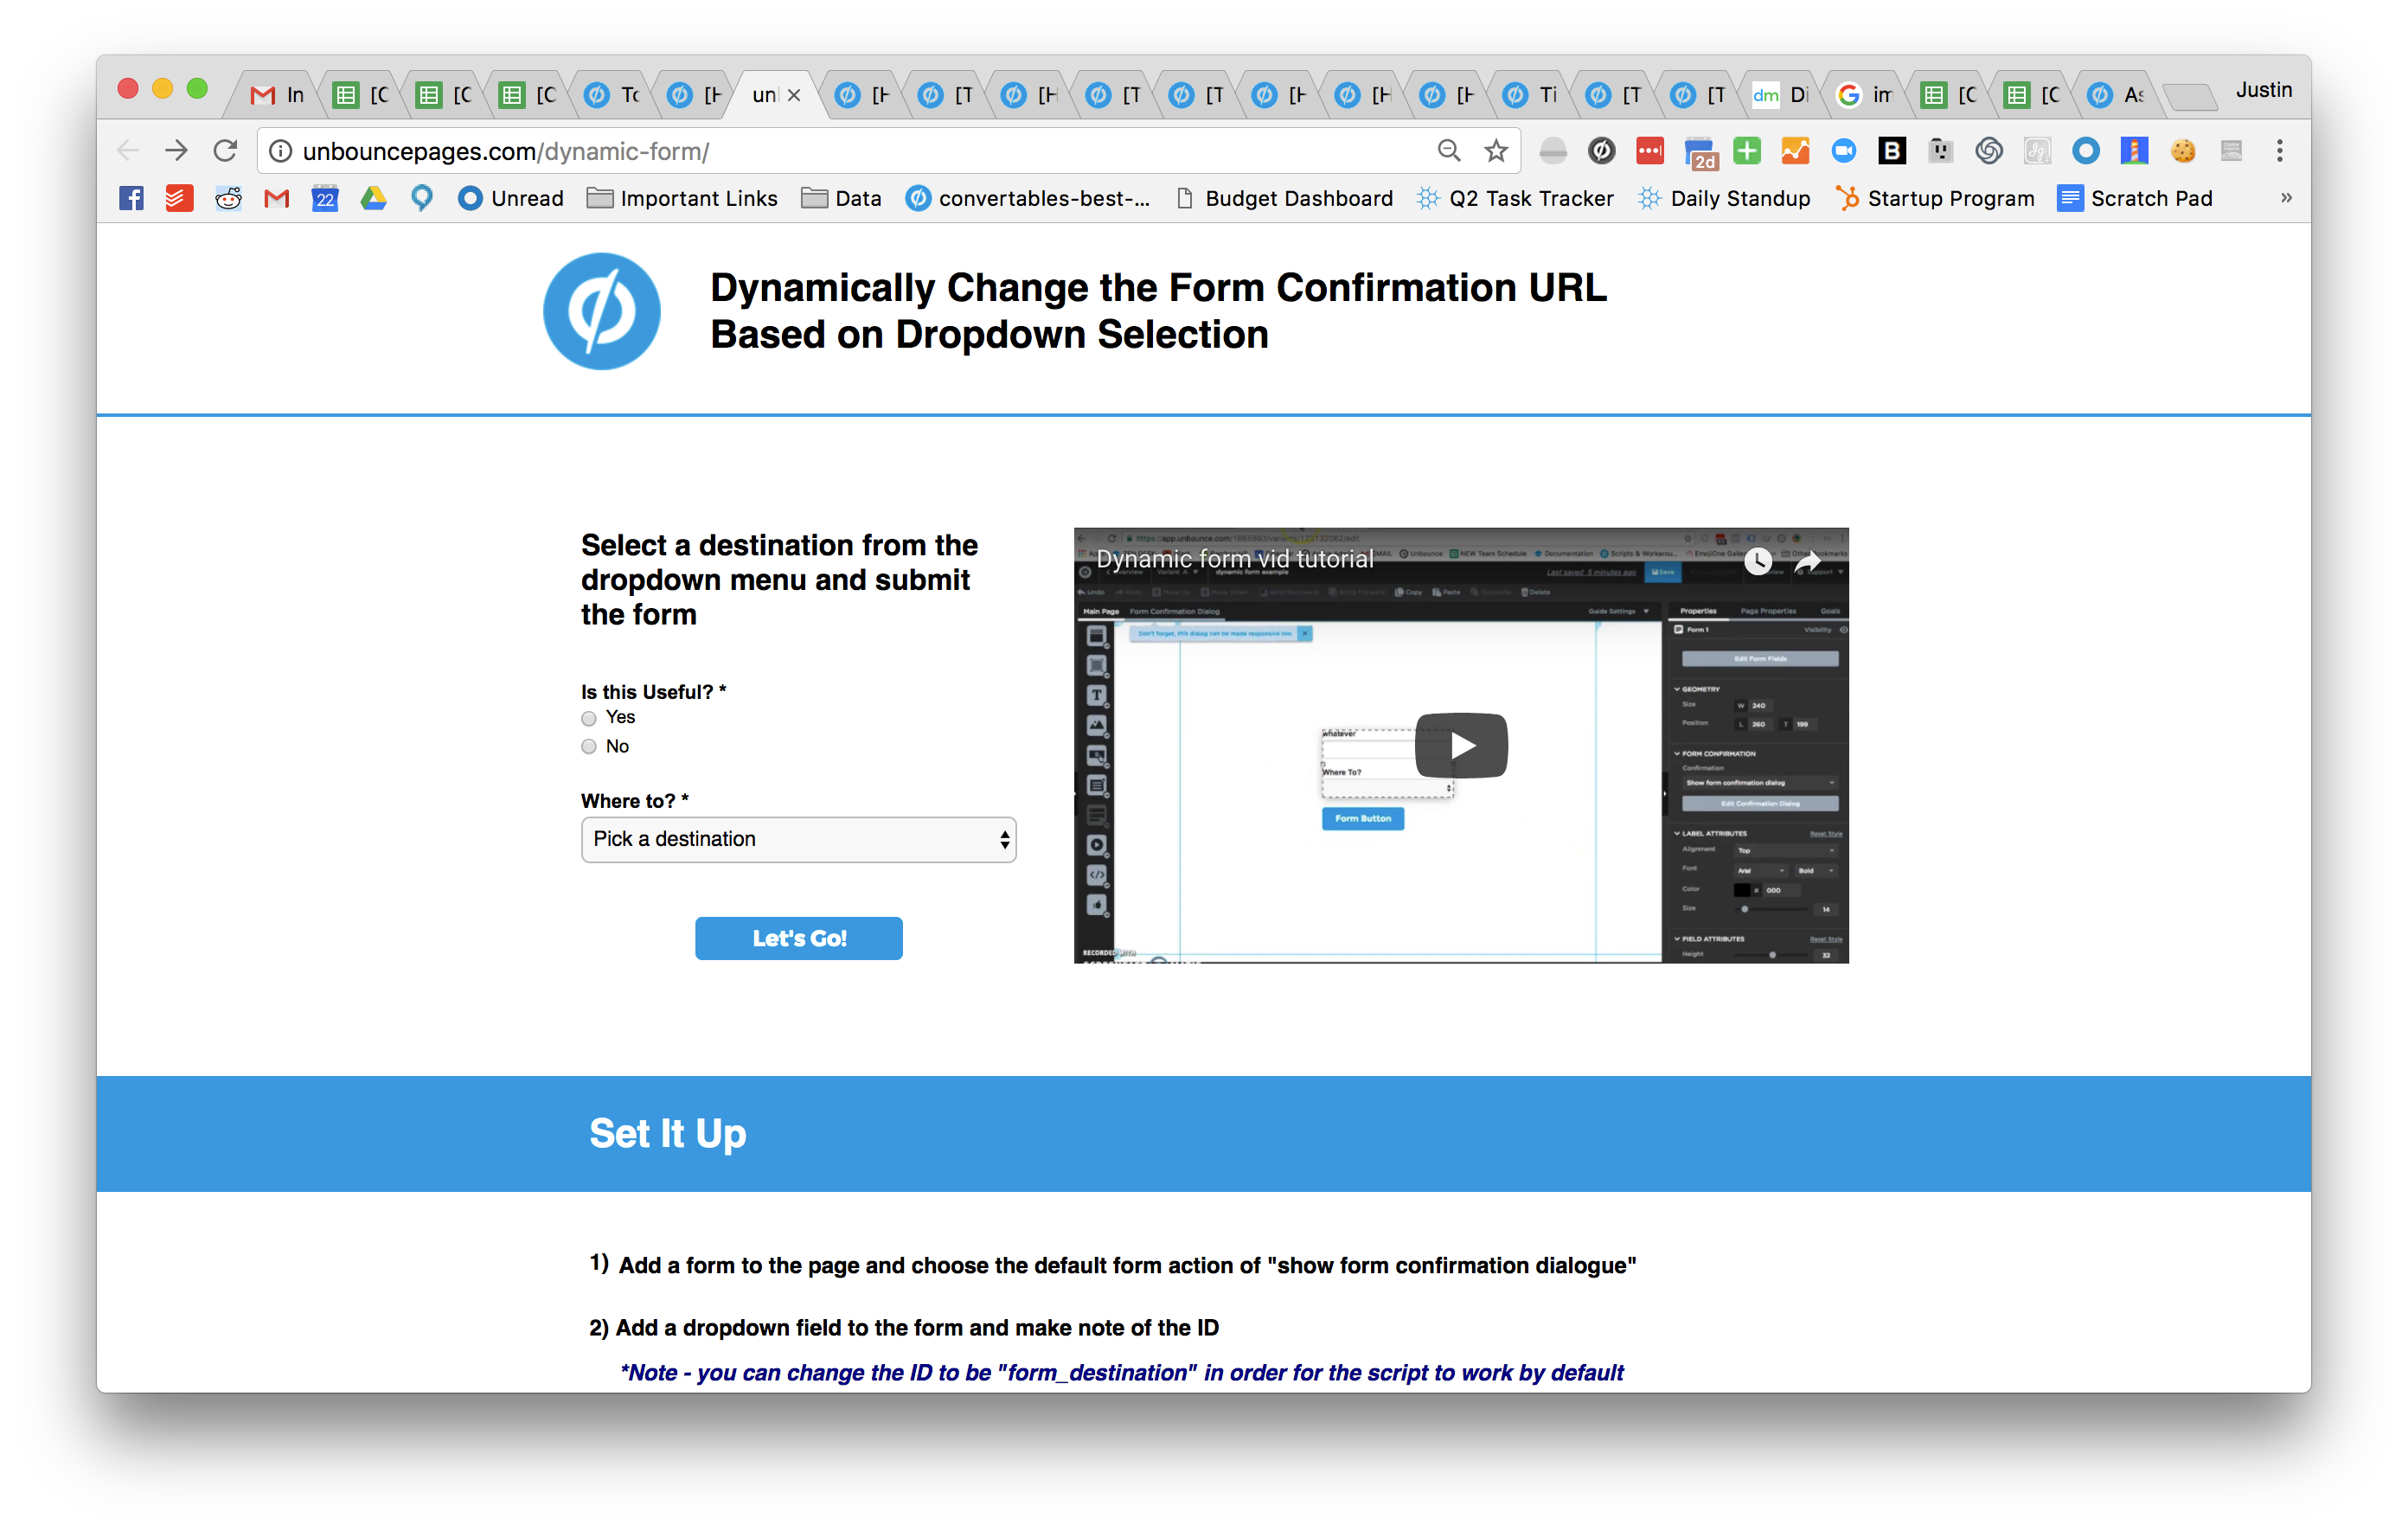
Do you want to send your leads to a different URL, depending on what they selected on your form? Now you can!


The form in Unbounce will need to be set up using the form confirmation dialogue. The script works by triggering a browser redirect almost immediately after the form submit action takes place (about 1 millisecond). The URL for the redirect will be set in the javascript.


NOTE: The script will only work if the form is placed on the main page. The redirects will not fire if the form is in a lightbox.


How to Install in Unbounce


Click Here for Instructions


🚨

This is not an official Unbounce feature. This functionality is based entirely on third party code, and has only been tested in limited applications. Since this isn’t a supported Unbounce feature, our support team will be unable to assist if things go awry. So if you are not comfortable with HTML, Javascript and CSS, please consider consulting an experienced developer.


See it in Action


You can see it in action, download the .unbounce template and follow along with the video tutorials here, or read below for instructions.


The Set Up


Step 1. Add a form to the page and choose the default form action of “show form confirmation dialogue”


Step 2. Add a dropdown field to the form and make note of the ID. You will need to add options in the dropdown field to assign a URL to.

Note: You can change the ID to be form_destination in order for the script to work by default.


Step 3. Leave the first option of the dropdown blank


Step 4. Add a hidden field to your form and give it an ID of “destination”


Step 5. Add the first javascript snippet to the MAIN PAGE - Edit the script by replacing the URLs in with URLs of your own


https://gist.github.com/RobertCam/15990124d7b9622e0503422e7305c8c5


Step 6. Add the second snippet to the javascript section of the FORM CONFIRMATION DIALOGUE


https://gist.github.com/RobertCam/3b3de761d3887b4ea92b36468bbea1a7


A Quick Note on the FCD


Unless a URL is assigned to a specific dropdown selection, the form confirmation dialogue will show when the form is submitted. Which means it’s still possible to use the FCD for specific form selections.


You can also show the FCD for a brief time before the page redirects (or for less time) by editing the delay time on in the script on the FCD.


Hide the FCD (optional):


If you don’t intend to show the confirmation dialogue to a lead and instead have the dropdown as a required field and all options mapped to a URL, you can use some CSS to hide the FCD from view.


The following CSS will hide the confirmation dialogue when the form is submitted:


https://gist.github.com/RobertCam/458662666994b511173d32a5cf274a8a


That’s it!


You’re all done and ready to start using the new found control over the form confirmation URL. Please use responsibly. 🙂


Can’t see the instructions? Log-in or Join the Community to get access immediately. 🚀


Want to take your Unbounce landing pages + Convertables™️ to the next level?

:spinbounce: Check out the Ultimate List of Unbounce Tips, Scripts & Hacks

@Rob you’re the man!!!


Hi, we are trying to implement this Javascript on one of our client’s pages. We followed the directions for Option 1 and keep trying to edit the code but nothing seems to be working. Has anyone else had this problem?


Hey there Jupiter,


It would be helpful if you share your page so the community here can try to troubleshoot it for you.


Best,

Hristian


Here is the page: http://unbouncepages.com/craftmatic-example/


Depending on the state the visitor selects, they may have to be redirected to a disclaimer before confirming to submit their information. Other states can go straight to the confirmation page.


If you select Alabama, Alaska, or Arizona, you should go straight to the confirmation page. If you select Arkansas, you should go to the disclaimer first. Currently, none of the states are going to the confirmation page, but are showing the confirmation dialogue popup.


@newjupitermedia based on a quick look your script placement is wrong. It should be set to “Before Body End Tag”.


As a general rule… Very few things need or have to be placed in the <–head–>.


Try that and let us know if it works.


Best,

Hristian


Thanks Hristian. We originally placed the code before the body end tag but were troubleshooting and changed it to the head placement. Neither placement seems to be working - we just changed it back to before the body end tag, but just tried again without success.


@newjupitermedia


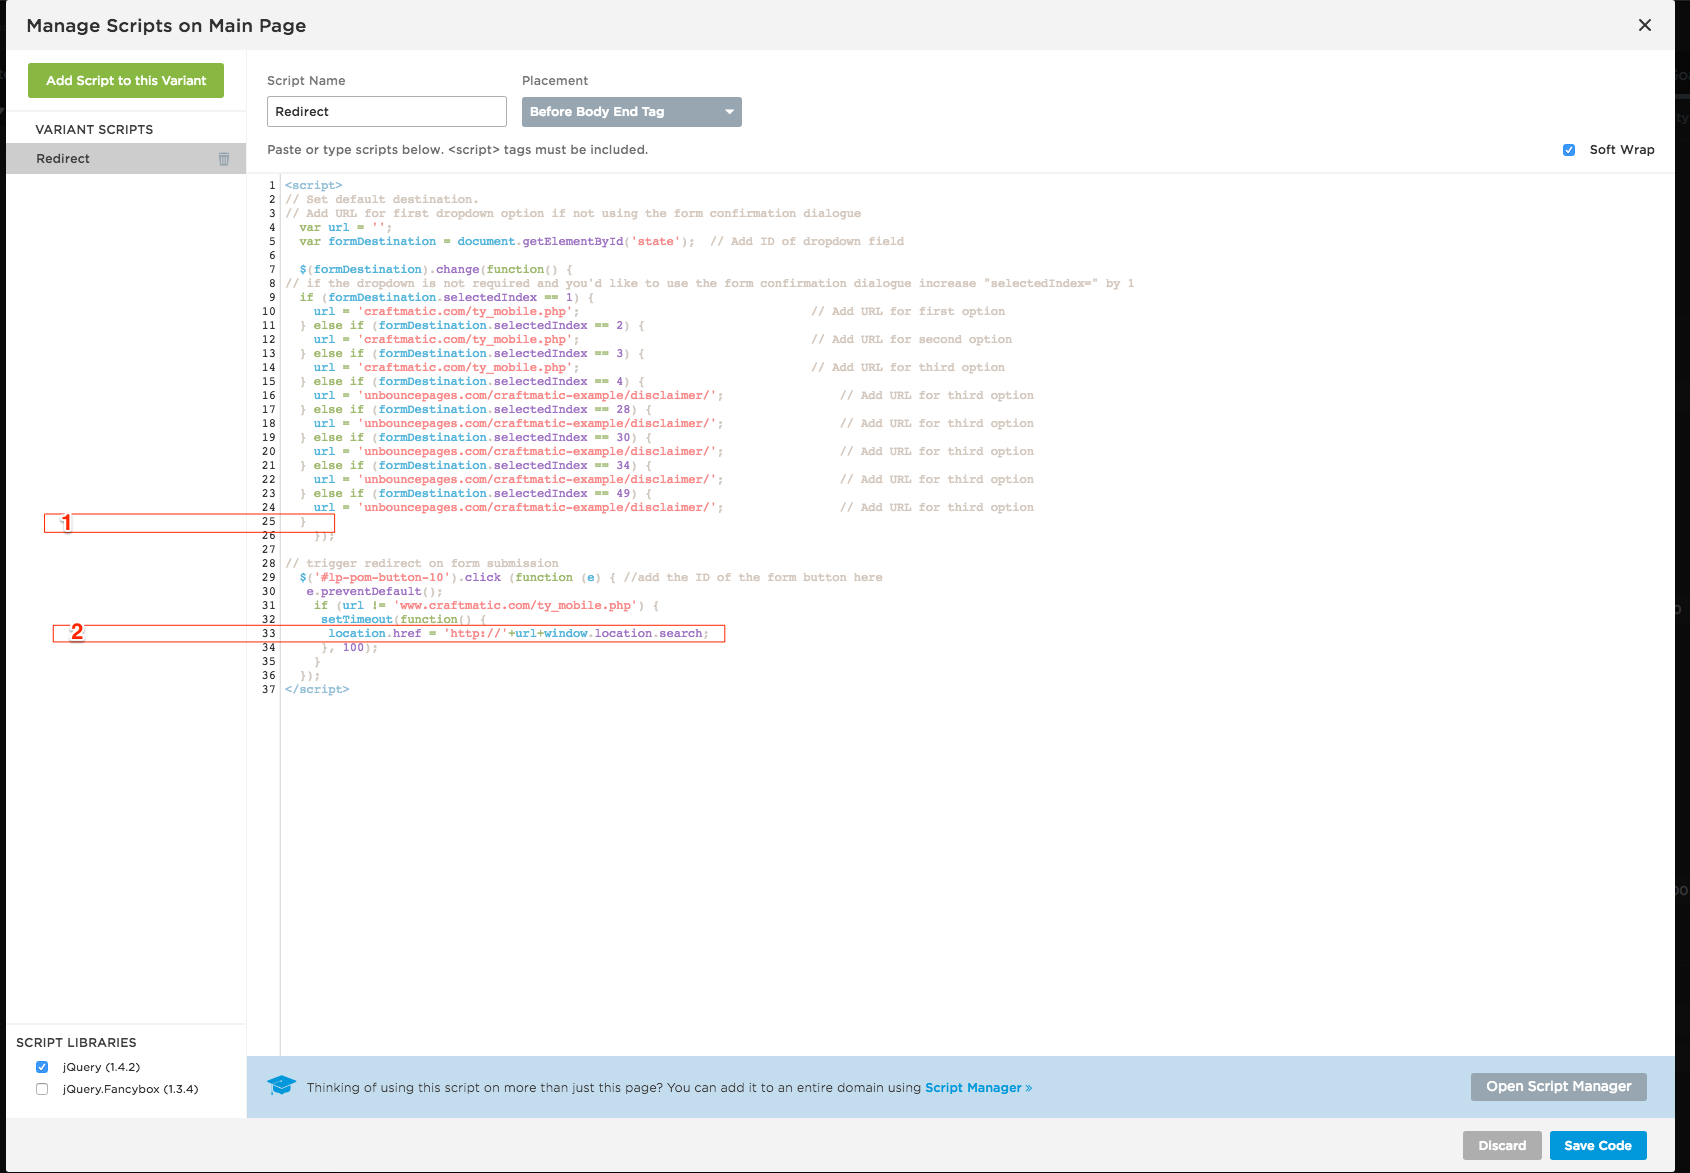
You have a couple more mistakes in your script.


  1. You have a missing “}” on line 25


  2. You shouldn’t place your full URL on line 33


Here is your script working on a demo page: http://unbouncepages.com/test-redirect/


Best,

Hristian


Great, thanks for that feedback. I made those changes but still can’t get the script to work - and I tested in an incognito browser so there shouldn’t be any cached mistakes. Could it be that another javascript is interfering, since the demo page you created seems to work fine?


@newjupitermedia


Arkansas redirect works so get rid off the URL in “var url” on line 4.


@Hristian Great, I also have Arkansas working now for the redirect to the disclaimer. I made that edit to line 4 without any success on the first 3 states though - they still just generate the pop up rather than going straight to the confirmation page.


Hi everyone, apologies for not monitoring this as much as I should have. Thank you @Hristian for stepping in here and helping out! You’re the man!


After reviewing this script a bit more I realized it’s fairly complicated to implement and there are lots of potential pitfalls with it. Soooooo, I’ve reworked it and made it much easier to add to the page. I’ve also done my best to keep it all in one nice package instead of having the three options. The functionality has changed a bit and you will need to add two snippets. One to the main page and one to the form confirmation dialogue. The user experience will be the same though (actually slightly improved in my opinion).


I’ve just updated the post here. I’ll be doing my best to keep an eye on this thread as well. So if anyone has any issues getting this working feel free to post here and I’ll do my best to help out.


Please forgive my inattention to this post and the late reply. I hope the updated script makes up for my past transgressions 🙂


Hi @newjupitermedia sorry I’ve been MIA on this post. I’ve made some major updates to this script to make it easier to implement on the page. You can find the updates here - http://unbouncepages.com/dynamic-form/


I’ve just updated the post here as well so there are updated instructions above as well 🙂


@Rob Hi Rob! Thanks so much. We will try implementing this new script today and will let you know how it works out! Appreciate you taking the time to look into this so much 🙂


Hi Rob,


This is great. Many thanks for writing this script. Can this work witha radial button as well?


Hi Rob,


Thanks for this script!. Just an issue we are finding is that instead of decoding the urls to have %20 for spaces it is using +'s. Is there an easy fix for this?


It seems as if its intended do do this with the below line but it doesn’t seem to work for us.


return decodeURIComponent((new RegExp('(?|&]' + name + '=' + '('^&;]+?)(&|#|;|$)').exec(location.search)|||,""]) )1].replace(/\+/g, '%20'))||null


Any thoughts?


Cheers


We had implemented this code and it was working until we tried to go live, now it is not working. We end up with a greyed out screen. Any insights or updated code?


@Rob I’ve ran into an issue where I cannot implement this script to work either on my clients page or a “clean” page that I have created just for testing purposes. Any chance you could help me with this I would really appreciate it. Thanks


Reply