Note from Unbounce
This script + tutorial will show you how to track “Add To Cart” button clicks as events with Google Tag Manager, when using Shopify’s Buy Button. You’ll also learn how to send those events back to Google Ads and Facebook Ads. This handy script was created by Community legend and Unbounce Expert @Jonathan. If you have any questions about this script, please reach out him directly or tag him in the comments section below.
A large part of turning more browsers into buyers is ensuring that not only are you putting the right content in front of your audience, but also that you’re able to track events accurately. As you may already know, a first-time product viewer is quite different from a 3rd-time product viewer who added a product to their Cart.
In ecomm, many advertisers decide to skip the cart entirely. In that case, the Add To Cart button takes you straight to the checkout page. This means you need to track any button clicks on Add To Cart and send that information back to Google and Facebook.
This gets even more tricky when using a Shopify Buy Button, since in reality, the Buy Button is a script in an iframe. In this post, we’ll show you how to track “Add To Cart” button clicks as events with Google Tag Manager, when using Shopify’s Buy Button. We’ll also show you how to send those events back to Google Ads and Facebook Ads.
🚨
This is not an official Unbounce feature. This functionality is based entirely on third party code, and has only been tested in limited applications. Since this isn’t a supported Unbounce feature, our support team will be unable to assist if things go awry. So if you are not comfortable with HTML, Javascript and CSS, please consider consulting an experienced developer, or asking a question in the comments section below.
Step 1.
Use Unbounce’s Script Manager to add Google Tag Manager’s script
Step 2:
Use Unbounce’s Script Manager to add Google Analytics’ script
Step 3: Configure GTM:
3.1 Enable important variables
By enabling these variables we can then see a variables value once an event is triggered. It was not needed for this demonstration but it is good practice to do so in case a user would want to create another event using a variable’s value. A variable’s value can be seen in the preview and debug mode.
3.2 Create a conversion linker tag
Conversion linker tags are used to help tags measure click data so that conversions are measured effectively.
Step 4:
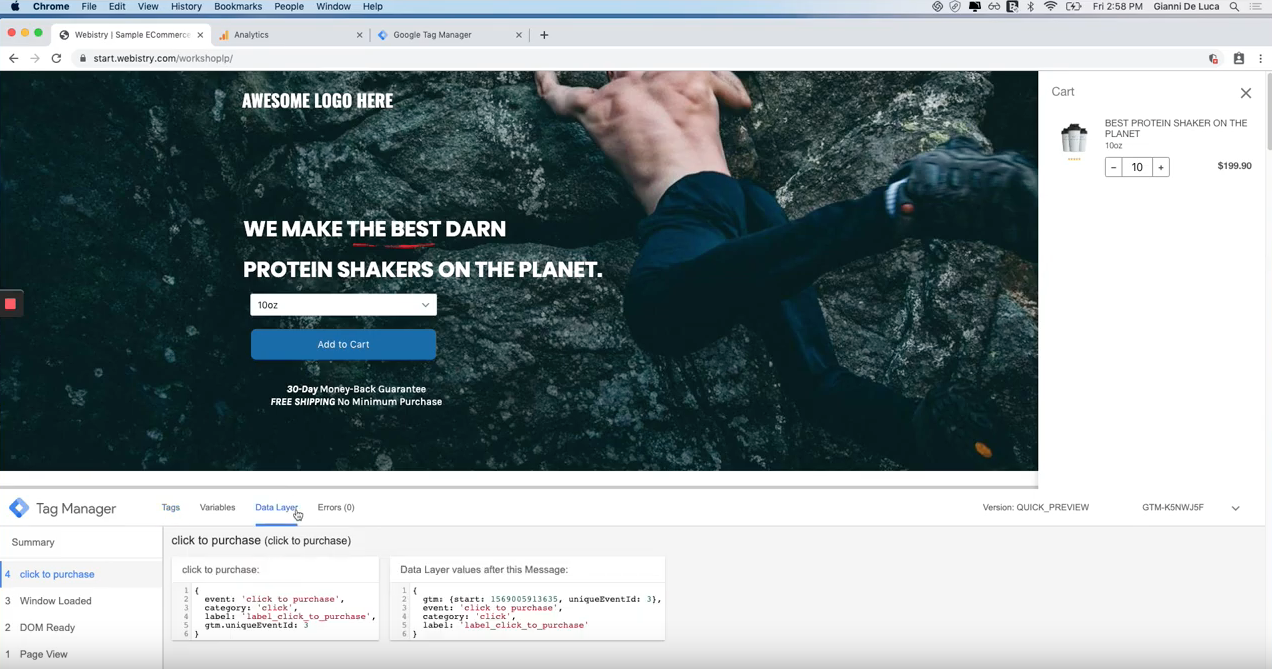
Important step for anyone using the Shopify Buy Button. GTM does not recognize it as a button, since in reality, it’s an iframe. Therefore, we need to help them recognize it.
Define a custom event called “click to purchase”
The point of the code was so that we can create an event when someone clicks on the “add to cart” button. The “add to cart” button is in an HTML element, which means GTM can’t identify it as a button. We edit the script so an event would trigger.
4.1 Copy paste the following script as a new Javascript Script:
<!-- jQuery -->

<script type="textjavascript" src="https://code.jquery.com/jquery-3.4.1.min.js"></script>

<!-- Script -->

<script type="text/javascript">

  function fireEvent() {

    // Wait a second for button to initiate.

    setTimeout(function() {

      // Get div id.

      var divId = "product-component-1568916154933-a"; // Replace this with your own shopify div id.


      // Get button iframe.

      var iframe = $("#" + divId).children().contents();


      // Find shopify button and bind click action.

      iframe.find(".shopify-buy__btn").click(function(){

        // Create analytics object.

        var dataObject = {

          'event': 'click to purchase', // Modify the event name here.

          'category': 'click',

          'label': 'label_click_to_purchase', // Modify the event label here.

        };


        // Check if analytics is enabled.

        if(typeof dataLayer != 'undefined'){

          dataLayer.push(dataObject);

        }

      });

    }, 3000);

  }


  fireEvent();

</script>
4.2 Replace the string on line 9 with your own div id. This div id can be found on Line 1 of your Shopify Buy Button script, in the iframe.

Step 5: Create the click to purchase trigger
This trigger needs to be created in order to fire the tags we want to measure.
Step 6:
Create a Facebook pixel tag (fires on all pages), Facebook page view tag (fires on the landing page url), Facebook click to purchase tag (fires when someone clicks to purchase)
Step 7:
Create a custom Google Analytics event that fires when someone clicks to purchase. This event will push to Google Analytics so we can see when the event triggers. We can also create audiences with this data.
Step 8: Test and confirm events
8.1 Test that the Facebook + Google Analytics tags are firing after clicking the add to cart button (Click to purchase).
8.2 Test to see if events are firing and send to Google Analytics after clicking the add to cart button (Click to purchase).
Want to take your Unbounce landing pages to the next level?
 Check out the Ultimate List of Unbounce Tips, Scripts & Hacks